
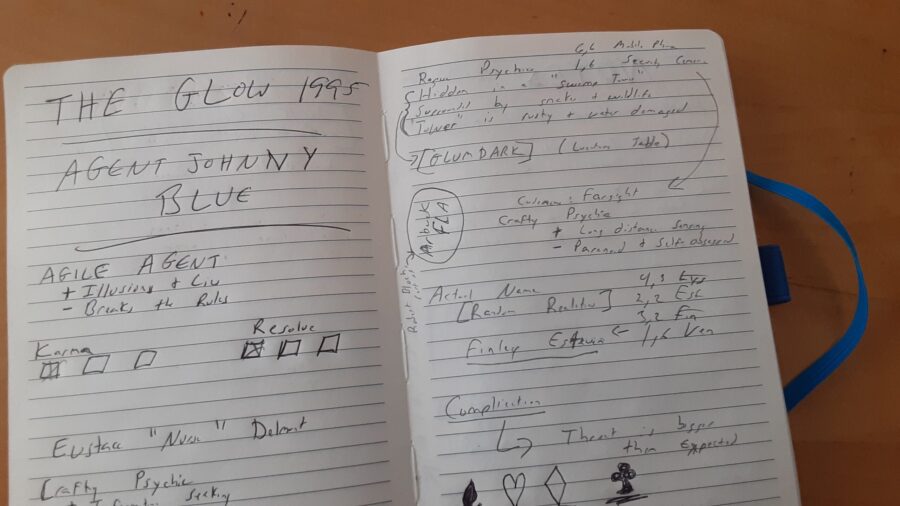
While in the middle of moving, I played what would become the first three sessions of a unplanned The GLOW adventure. Very quickly, this adventure began to morph into an important bit of character and lore building. Realizing I had something a lot more than a one-to-few shot on my hand I started pivoting towards a fuller longer story. Before we get to the actual play, though, find out about my more limited set-up and my initial expectations of a "The GLOW 1995" before it became "The GLOW 1992: Agent Johnny Blue vs The Kid" that has been foreshadowed since early in the meta-series.

After a semi-recent watch of the semi-recent movie, Freaky Tales, I began to contemplate what such a format might look like in a solo rpg. Then I started working out how I might combine this with Jason Morningstar's Fiasco. The dream is to create a short solo campaign centered around a cast of related characters [at least thinly] where each POV is largely unique but with some degree of interweaving the plot. Possible for a future experiment on this blog.

In this session, our heroes confront a hungry troll just looking for food and a trio of sea nymphs who just might be interested in something very nearly like revenge. Also featured are large piles of trash and lots of walking. As you do.

Gryffin leads his team back into the sea caverns to continue the search but things almost immediately go wrong once a room with a strange curse enthralls one of the members.


After months, it is finally return to the world of the Bleak + Pearl. What changes will I make (both in story and gameplay) and what sort of expectations do I have bringing this back into a more traditional "Doug Alone" format?

Like many solo roleplayers, it can be almost overwhelming at how many games I could play. This post is me trying to work out a few possibilities and sort them. How well it predicts any content that actually makes it to The Doug Alone, I have no idea.

Sorting all my thoughts about the highs, lows, and could-have-beens about The GLOW's second campaign arc: Psychic Eustace Delmont.

One of the most intensive campaign arcs I have played that tapped really hard into the sort of mythos and characters I like. I wasn't completely satisfied but before I get my thoughts in the next post I want to take a moment to go over things and discuss some general beats and moments to better sort my ideas and refresh my memory.


- "Previously..." and Campaign/Arc Summary
- The GLOW 1996: Psychic Eustace Delmont Episode 21 — The Nurse House Calling the Doctor
- The Final Advance
- The Waiting Room
- For the Final Time
- Tumbling Down
- The Death of the Witch-King
- The Nurse's Choice
- NOT the GLOW 1999: Transporter Jani Blum
- Doug's Commentary
- Credits
Previously, on The GLOW: 1996 Psychic Eustace Delmont
The team has fought their way to the top of the Rambler — Dr. Roman Patel's floating skyscraper. Nemesio Jones has gone back downstairs to help people evacuate. Varvara Clean has stopped to destroy all the data she can find in the communications hub. This leaves Genny, Hitomi, and Eustace to confront The Doctor himself as well as his two elite bodyguards: Yori and Ambra. The "siblings." No matter the outcome, the Patel empire is going — quite literally — to crumble. And once the Witches Three get what they want from Eustace, what will happen with the rapidly dying psychic?
About The GLOW: 1996 Psychic Eustace Delmont
Eustace Delmont is a psychic on the cusp of "graduating" into a full-blow Field Psychic. He requests his right to Walk, a brief period of freedom to encourage psychics to see the other side of The GLOW. He tries to finish his long-time partner Jani Blum's final unfinished mission: to find a mini-disc and crack open the Patel crime family. He meets Hitomi Meyer, a criminal hacker. The two are now on the run between a powerful crime family and an even more powerful adversary: The Order and its plans for Eustace.
Content Warning: Occasionally very foul language, lots of smoking, quite intense violence, drinking, gambling, non-graphic sex, drugs, criminal behavior, and black magic. The GLOW is a world of spiritual torture and weird horror.
This post is in the standard Doug Alone post style. See Anatomy of a Post for more details.
Attribution for the tools and materials used—including the splash art—can be found in the Credits below along with some details.
The GLOW: 1996 Psychic Eustace Delmont. Episode 21 — The Nurse House Calling the Doctor
The Final Advance
If I remember correctly (and maybe I do, maybe I don't, it has been a minute since this campaign arc started), Hitomi and Eustace took a second advance right before Eustace's death, in what was supposed to be the quick build up to them assaulting the Moonblink. Genny took his one advance right before they went for the villa. Jones and Varvara have not had an advance but currently are "out of action" and carrying out the mission in other ways.
I figure, then, that Genny and Hitomi are both due an advance. Eustace is a weird case. He effectively half-advanced when he was resurrected. We'll leave him be for feats — or swap one out — but maybe get him brought full up on skills.
As for Jones and Varvara, if they do show up in the final battle I'll just quick speed some stats for them.
Advancing Hitomi
Let's up her survival a bit: +1 to Endure and Cool. Also, we'll give her +1 to Know since she has greatly expanded her understanding of the world these past 7-10 days.
We'll also give her the Mastermind feat. She can spend one ADR to repeat any roll and can ignore penalties due to complications like conditions and circumstances.
She is full up on ADR so won't get one.
Advancing Genny
Endure +1 makes sense for him. +1 to Heal to show him working more as a team. +1 to Dexterity.
For his Feat, we'll go with Combo. After he gets one hit he can spend ADR to keep stacking Grit.
He gets +1 ADR and is now full up on ADR and spotlights. He's gonna spend them all this time.
Advancing Eustace
For Eustace, we're going with just Endure, Stunt, and Cool.
We'll switch out his Outsmart Feat for Martial Artist. He has switched to being way more physical than mental in his mood.
Note: this presumably doesn't work when he's using his claws. If anything, it'll be more about dodging that hitting.
He also gets +1 ADR.
EPISODE SOUNDTRACK: While this isn't Eustace + Hitomi — even if the two campaigns share a lot of genetic code and cross-reference one another — a major part of the final half of that arc was blending in music that Hitomi was listening to in world. Combined with the need of something somewhere between angry, hopeful, bombastic, and somber, the pick for the final episode's soundtrack is...
Smashing Pumpkin's Mellon Collie and the Infinite Sadness.
Setting the Scene, e21s1.
Basically just a time out scene, though we'll do a scene test for the next scene.
[NEXT] EXPECTED SCENE: The team confronts Patel and the Siblings in the office that started this whole campaign | world | series.
SCENE TEST: [c83] 5. 2d10 = 4 + 7. A minor alteration. "A friendly NPC changes drastically."
ACTUAL [NEXT] SCENE: Juan Uno has given in to Roman Patel's threats | bribes | something and is trying to air lift the three off the roof.
This scene will be them in a lounge trying to get ready for the showdown. Instead of a shoot-out in an office space, it'll be a roof-top show down. I think I've been planning to have Juan turn on them for a moment but for now we'll say that Patel has threatened Juan in some significant way. What significant way? [c119] Meet [c27] Defiant [c41] Lies. Hmm. Juan is trying to actually protect Hitomi. Patel has lied to Juan and said that he will kill Hitomi unless Juan gets him passage out.
Rather than making Juan able to pilot a helicopter, it will be Julian.
DATE PLAYED: June 9, 2025.
The Waiting Room
Date: June 7, 1996.
Time: 3:51am.
Place: The private lounge on the 28th floor of the Rambler.
"I'm telling you I am looking at the main offices and they are all empty, unless Patel is hiding under a desk..."
"You think they escaped?"
Eustace is going to try and seek them with his greatly enhanced psychic powers.
Focus (3) + Cool (3) = Extreme.
Eustace interrupts Hitomi and Genny's bickering: "The roof." Hitomi tries really hard to ignore the fact that it sounded like her voice that came out of his mouth. Eustace is losing himself even faster now.
She instead types in commands to see the roof and indeed Dr. Roman Patel is there with two people she recognizes. The strange maybe-Siblings. Back with their strange eye-wear.
Genny asks, "Why are they up there?"
Hitomi points to the large letter H near their feet. "Helipad. Pick-up."
"Shit."
"Wait," Eustace says, this time in Mrs. Yuuki's voice. He leans forward and stares carefully at the screen.
He's going to spend ADR to roll two weak spots and pick one.
Weak Spot 1: (5,1) The enemy is exposed (or standing under a precarious structure). Shoot at Nerves + Shoot + 1.
Weak Spot 2: (5,5) You can lure the enemy into a trap, skip next Reaction turn.
Both of those sound really good. I'm going to go for #2 though because in the long run, not getting shot will be the key to surviving the next fight.
"There, that panel. It accesses the aetherware that keeps the Rambler afloat. If we can disable the locks on that we can use it to catch them off guard."
"I can do that," Hitomi says and clacks on some keys. "Anything else?"
Eustace shakes his head. Genny nods and stretches, checks his ammo.
"The good doctor is waiting and if I hear correctly, his coach is nearby. Let's go..."
Setting the Scene, e21s2.
One thing I need more practice with when it comes to Outgunned is balancing fights. In this case, it is no doubt that it will be Extreme/Extreme. However, the long-game of taking away Patel's toys has been helping with some of his powers. The last time Yori and Abra were fought, they had the following Feats/Special Moves:
Bulletproof vets (-1 to Range), Hard to Kill (each Hot Box stops damage even if damage goes over), and Martial Arts (-1 at close unless you have Martial Arts). Special actions include Disarm (1, Critical vs Brawn vs Dexterity or lose weapon), Don't Think So (1, negates on Adrenaline special move), Weak spot (-2 to next Reaction roll), and Escape Clean (2, as it says, Impossible to stop it).
I like that mostly. In fact, I will largely keep it. They now have more defense. Are still quite deadly. The only change I will make will be to give them 9 Grit with Hot Boxes on the 3s (including final 3). And I might use their ADR in funky ways rather than the given sets.
Also, screw it, what's the weather? → [c66] 5. Pretty dang normal. A bit windy but overall a calm early morning for folks to die.
By the way, if either Hitomi or Genny falls, then Varvara and Jones will show up [in that order]. We'll figure that out when it gets there.
DATE PLAYED: June 9, 2025.

For the Final Time
Date: June 7, 1996.
Time: 4:04am.
Place: The roof of the Rambler.
"Um, Eustace...," Hitomi says as they stand at the door to the roof. She realizes she can see through him. Not completely, but enough for it to be disconcerting.
"Oh," is all he says. Then he takes the final orb of Soulburn he stored back at the Villa and pulls it from his chest. After crushing it, his form focuses back to solid. "Sorry, Foxteeth, not much time left. I'm burning away."
"Why do you keep calling me Foxteeth?"
"An alternate reality. Where I lived and became the terrible Witch-King of the GLOW. You were my best agent. Foxteeth. The Dark Queen of the Order."
"Was I a sexy dark queen?"
"You know it."
"Kids...kids...hey, are we ready? The bird is awfully close to landing," Genny interjects. Though he at least looks sad that he is interrupting what might be their last chance to talk.
Eustace and Hitomi brace against the door and prepare for their assault.
Genny holds out his fist for a fist bump. "Witch-King and Foxteeth. A pleasure to work with you."
"No, not Witch-King. Nurse. And Mochi. Same, Genny."
And with that they are in the early morning darkness as a helicopter approaches for landing. A helicopter that Genny recognizes. "That's Juan's personal 'copter, what the fuck?"
"A double-cross?!," Hitomi shouts to be heard over the noise.
"Who the fuck knows?"
Eustace kicks off and flies at speed to aim for the three people so intently watching the helicopter they have noticed their attackers. His target is the woman with glowing glasses, Abra.
Brawn (3) + Fight (3) + 1 (Blades) + 2 (ADR spent on cyber arms) = Initially, a Critical. A reroll gets us to Extreme. Eustace is risking it and going All In. It actually works and upgrades to Impossible. 3 Grit lost. I love it when risk pays out.
She is turning right as he slams into her side and even as she struggles to throw heavy punches at his face he blocks each and every one. Doing a quick turn in the air, he gets her up off the ground and then kicks her into an air-con system. Her body crumples into metal. Before she can retaliate, Eustace is up in the air and flying away.
Ok, Doug here. I know I established in the villa fight that Eustace can lift people and then drop them from a fatal height. I'm skipping it this time on purpose.
I might regret this but these people have been prepping for this fight for a good while. Let's trust the heroes.
Genny and Hitomi say nothing as they open fire on the other two.
Genny is 100% emptying a clip (which negates their -1 penalty, essentially) and at a range to get +1. That gives him Nerves (3) + Shoot (3) + 1. If he lands a hit, he is going to start emptying his ADR to jack it up to the max. He scores...nothing. Essentially. Got a Critical + Basic and went all in to try and upgrade but whiffed. This means he has burnt down to just one clip left and can no longer full burst.
Hitomi has Nerves (2) + Shoot (3) - 1. She'll spend 2 Adrenaline to make it 6 dice. She gets a Critical + Basic. Not enough. But she has Mastermind that allows her to reroll (at the cost of 1 ADR). Hey, three Adrenaline down but she gets an Extreme. That's 4/9.
For this first reaction round, we are going to just have Genny and Hitomi spend a Spotlight each to avoid the damage. Cheesy, I know, but I'm saving them up for a reason. Hitomi wins the coinflip. Genny does not.
By now, Patel and the Siblings have figured out they are under attack and are moving to take cover as best they can in the railing on the other side of the helipad. Abra is starting to shake off her wound and is running full on for Genny. Yori opens fire on Hitomi. Both dive down out of the way and keep ahead of their attackers.
Juan's helicopter, close enough now that Genny can see Julian Shame piloting it, is trying to get down as Roman Patel waves for it to land. Genny takes his radio and throws it to Hitomi. "Channel 17. Ask him what the fuck he thinks he is doing!"
Hitomi snags that and rolls under the a complex telecommunications array to get out of the gunfire.
Genny tossing the radio was his Quick Action so he has no chance to reload. He's going to have fight this time (using his gun as a weapon). He does not have Martial Arts so he is at -1 versus Abra. Brawn (3) + Fight (3) +1 (Gun-as-club) -1 (Abra's skill level). He gets 3xBasic = Critical. Not enough. Screw it, he'll spend his second (of three) Spotlights and then 1 ADR to bring the damage to the next hotbox. Coin flip is he loses it. But the team is up to 6/9 Grit lost. Unfortunately the bad guys now have two ADR to spend.
Eustace is going for Roman Patel. He gets an Extreme this time but only has a Basic so is still in the thick of it. (7/9)
Hitomi's Full Action will be her diving for full cover. Her Quick Action will be to radio Julian.
"What the fuck are doing, Jooleeannn?," Hitomi screams tauntingly. In front of her, Eustace has just landed on top of Roman Patel and knocked the man down. Yori is turning his gun to the back of Eustace's head. "GENNY!," she shouts but sees the old soldier is swinging his rifle at Abra's head. Abra ducks but finds Genny's boot in her gut. And then the rifle to her head.
"Um," Julian's voice comes over the radio. "Boss said that he made a deal to keep you safe. Only..."
"ONLY YOU ARE HELPING THE ASSHOLES THAT WE ARE TRYING TO STOP FROM KILLING US!"
"Roger that..."
Hitomi takes a deep breath.
Rather than have her roll for it, we'll do a test, does Julian bail on saving Patel? (Even) → [c86] No? He is still too loyal to Juan to completely ignore the orders.
Hitomi asks, as nicely as she can, "Can you pretty please just fly away?"
"I don't know, let me talk to the boss..." and then he cuts communication.
"Ah, fuck..."
Hitomi is in full cover and out of firing range.
Genny is going to save his last Spotlight to shoot Patel. Brawn (3) + Stunt (3) -1 = absolute whiff. He is taking the hit and the full 9 Grit. He has also has "You look Hurt" and will be at -1 for Brawn rolls going forward.
Eustace will spend an Adrenaline to turn and slice at Yori at close range. Brawn (3) + Fight (3). Critical + Basic absorbs 4 of the 9 Grit. He takes 5.
Genny is hit so hard in the face that he feels teeth crack. It might be a few days before he can talk without a lisp. He sags to one knee but stays on his target, slapping his last clip in. He sees Eustace slicing at Yori's face but taking shots right to the chest. If Eustace was any more human, he'd be losing a quantity of blood. As it is, Soulburn is seeping through.
Patel, pulling a high-powered aether-enhanced gun from a shoulder holster, points the gun at Julian and the helicopter.
"Drop your fucking weapons or your boy eats raw Soulburn!"
They are spending 2 ADR to activate their Weak Spot special reaction. This will make everyone -2 to their next reaction. Since they do Extreme damage, that is bad. However, the heroes have a Weak Spot of their own.
Eustace is out of Adrenaline so only gets 7 dice this time. He actually puts his claws up for the free reroll. Just straight punches. So that drops him to 6 dice. Nothing (he had a critical but couldn't upgrade it to Extreme).
Genny is going to pop his last Spotlight and empty his Adrenaline to blast Patel off the roof (and he actually gets the Spotlight back). This will "end it" but the twins have a trick up their sleeve about getting away...however.
The Weak Spot involves opening a trap underneath. {Yori | Abra} → Yori. Yori will drop which will cause Abra to go and try and help him. They don't have enough for a clean get away.
Is the aetherwork system deadly to fall into? (Even) → [c60] No? I figure since the fight is "over" that it doesn't quite matter. Still, sounds more like it is a bit of a drop but not like...crushing death.
In response to Patel's threats, Genny falls to the side and opens fire directly upon Patel himself. Doctor Patel stumbles with each shot until the third sends him tumbling over the side of the Rambler. Abra screams and goes to bash in Genny's head when she hears Yori shout out. During the fight with Eustace, he has stumbled right over the trap laid earlier. Yori tumbles down into the aetherwork gears. Abra screams his name as she runs to save her "brother." Right as she gets to the grate and leans over to help Yori out, Eustace shoves her inside and calls out for Hitomi to re-engage the locking mechanism. The grate is shut with a loud magnetic clamp.
Eustace sends out a psychic message loud enough that Hitomi and Genny hear it as well. People out to see on fishing boats likely hear it. Maybe further. Get out of the building or get to the roof. Along with a vision of the building coming down. Now. Screams almost immediately pick up from below as multiple combatants prioritize self-preservation over their squabble.
We'll throw three "Good" cards. At least two yes results means both Jones and Varvara have completed their tasks and can get to safety.
[c40] No? [c29] Yes. [c30] No? Hot dang.
Varvara isn't going to be able to get to the roof in time.
Then Eustace pulls out his scrying glass, unused for so long. Cracked and half forgotten. He calls a number he just knows and asks for a name. After a half minute of waiting, he tells the person on the other end: "Amy, drop it."
Hitomi is waving the helicopter to land while Genny limps over, keeping an eye on the roof access door. "Where's V?," he asks.
Eustace points at Hitomi as she is running towards him. "Genny, get her on board." Then, before Hitomi even registers Genny picking her up and pulling her into Julian's helicopter, before she can call out for Eustace to come back, he takes over in flight fast enough to punch through the doors and heads down to get Varvara.
Brawn (3) + Know (3) = AFTER GOING ALL IN...2xCritical. I'll say that's good enough.
Varvara has collapsed by a pillar and watches the fire spread. She knows she should heed the message and head up to the roof but she kind of doesn't think she can. The past hurt, earlier. Filip, her beloved older brother. So weak. Effeminate. Queer. Picked on a lot. One day some bullies trapped him and threatened him. And Varvara found out and scolded sweet Fil. Told him to be a man. So he did. He got better at fighting. Better at killing. Until the two of them had to flee here to this hell. That day, she could have praised him for his poetry. For his tiny little paper sculptures. Praised him for his beauty. But she mocked him like a bully. And now he is dead. Why not let herself die fixing that one mistake?
And right as the smoke fills her lungs and things go dim, an angel with rainbow wings punches through the darkness, scoops her up, and explodes into the outside.
The Rambler comes tumbling down...
Setting the Scene, e21s3+.
That essentially ends the game. I'll do a couple-three quickish vignettes.
DATE PLAYED: June 10, 2025.
Tumbling Down
Jones was shocked that folks that should be shooting at him were shouting thanks instead as they got on the elevator and went down. Rats fleeing the Titanic and somehow instinctively the chubby black man with a shotgun to be there to help. Which he was, but he wasn't sure if he was happy about it.
After giving a count of 100 since seeing the last group down — a few folks that just screamed "accountants" along with three guards — he got on the elevator himself and rode to the bottom. After that, he just stared up. There was enough chaos on the ground — MUNI had joined the fray, along with Order Mages and Witches — that it was hard to see anything else except that a helicopter trying to approach the roof. After the sound of gunfire from up above, a body fell and slams into the ground. Jones was pretty sure it was Roman Patel, but that would be forensics' problem.
Then came the voice. Eustace. Telling people to flee. Complete with a slide show of death raining down. So Jones fled. Shouting that everyone needed to get back now. People shouting and confused in return but starting to move as he got closer. Sure, they heard the voice, too, people kilometers away probably heard it, but Jones strangely felt like people were listening to him. Folks that greatly outranked him in the GLOW hierarchy.
He did not look back as great crashing roar of the Rambler slammed into the ground. He did not look back as it tilted — luckily not in his direction — and collapsed over two city blocks (mostly rubble by this point, anyhow). He did, however, look back when he heard gasps. And there was Eustace, carrying someone. Only, a few meters from the ground, the Soulburn wings blinked out and Eustace fell.
As everything does, eventually.

The Death of the Witch-King
Varvara is just starting to accept that she lived through the adventure and relax in Eustace's arms when she feels him sag and suddenly they are falling. Ten meters later she is on the ground and rolling as best she can. Around her, the world is an earthquake as the thirty-stories of reinforced stronghold that was the Rambler hits with a force of a bomb.
She is running back to the limp form of Eustace Delmont. The "other" Eustace is completely gone and he remains mostly just a husk of who he was. She leans down and lifts him up, shocked at how light he has become. He blinks at her, having trouble focusing on her face. "Hold on, we'll get help," she says.
"Your bother, Filip, he never held it against you."
"Please shut up and just hold on."
It takes Genny holding a gun to Julian's head to have the helicopter get anywhere close to the ground, but it is good enough for Hitomi to risk leaping off and running in the direction they saw Eustace collapse. As Julian starts taking back off, Genny — a body full of pain and contemplating retirement more than he ever has before — sees Hitomi throw herself down near Varvara. The early morning sunlight bathing everything in a sickly pale light. Genny sighs. Happy endings don't happen in this damned town. "Let's go," Genny garbles through broken teeth, "Juan has some explaining to do and needs to get the whole squad out to help keep things together."
On the ground, Hitomi is helping Varvara lift Eustace and my god he looks like photos her mother had of her maternal grandfather after being released from a POW camp post-World War II. A skeleton held together by flesh. She presses her lips against him and is terrified at how cold he already is.
"Sorry. Mo. Chi. I wont..."
And then Eustace Delmont, Witch-King of the GLOW, dies. Again.
The Nurse's Choice
Eustace opens his eyes and is floating in space. Above a planet all magenta and full of crystalline structure. Flying from structure to structure are creatures that are the same species as the Witches Three.
Our home world.
Long gone.
Finally avenged.
"Has it been reborn?"
No.
No.
No.
"I'm sorry."
The three beings floating around him like points in a triangle remain silent. Three beings from a race so complex that the name of it is impossible for him to properly conceive.
"So," he says, awkwardly, the long fought confidence of these past few days dwindling, "I'm dead, right?"
Yes.
But an offer we can make.
We'll join our sisters and give our stored energy to bring you back, again.
"Is there a catch?"
No catch. Only a decision.
Do you wish to be the terrible Witch-King and lead the GLOW to conquest?
Or maybe a normal man outside the GLOW, a fisherman or a librarian?
Eustace thinks about it for a while. Years. Days. Microseconds. What does time mean when above a planet that is so ancient that it was stardust before life on the earth — at least life as Eustace thinks about it — was started?
"Neither."
Oh.
Ho.
Ha.
"I'm not a Witch-King. I'm not a normal man, though I'd be a kick-ass librarian. I'm a Nurse."
The Witches Three laugh and laugh.
Back in the GLOW, the temporary peace brought about by the collapse of the Rambler is, well, collapsing. MUNI is moving to arrest people, the Order is trying to outrank MUNI, and many of Patel people are trying their hardest to fade into the night. That's before you get to all the damned tourists who have showed up in early dawn to snap pictures like they aren't in mortal danger.
Hitomi and Varvara are crying over the corpse of Eustace when suddenly he sits up. They are too stunned to say much as he stands, wobbly. And then flicks his hands in a complex series of motions.
The rubble of the Rambler starts drifting up and dancing around and reforming into buildings. Fires diminish. Streets rebuild. The process feels almost instantaneous to those watching but it also feels like it takes weeks and weeks. Frozen in time while the GLOW heals.
When it is done, the only change is where the Rambler was, a pair of thrones stands. Made in part of the same mahogany desk where Amy gave Jani that mini-disk all those days ago. Towards the throne on the left, Eustace walks. As he does, his body rebuilds itself. Only, instead of a hulking warrior, he is a 35-year-old man who has gone a bit fat. Still fit, just slouching to middle-age with a bit of grace is all.
When he sits and faces the crowd, Hitomi notices all the sigils that had scarred his body have faded. Leaving only a single mark, on his chest right over his heart. A simple ancient word for "Nurse." In a language spoken before Ubbo-Sathla broke down into chemicals and faulty alien technology and gave birth to terrestrial life. Before Mana-Yood-Sushai's great dream flooded into the first primates. Before Skarl's drumming was mimicked in each and every heart beat. Even before Cthulhu and his mad devotion to Azathoth lead to a intergalactic war and the High Priest ended up imprisoned on a simple rock of a planet. Waiting for the stars to be right. Which, without Yuggoth, they may never be.
She does not know where any of the words she is thinking is coming, but she sees Eustace — and really Eustace now, not some Witch-King or psychic monstrosity — looking at her and she has a memory of their first meeting. In the parking lot of the Rambler. Her crying over her missing dog. Him, so fat and curly-haired, holding out a box of tissues. Wait, that's not right. That's not how they met all. Also, fuck, she forgot about Libby. Only now Eustace makes another gentle gesture with his hands and there is her little cute robot pet standing next to the other throne.
Hitomi walks up. "What's all this about, then?"
Eustace speaks in a voice she knows so well, but even quieter. Calmer. She feels like she is hearing his real voice for the first time ever.
"Hitomi Meyer. Mochi. The woman who could have been Foxteeth and burned the world. Will you marry me?"
"No world burning?"
"Only if it really, really needs it."
She leans over and whispers something in his ear and he laughs and laughs. Then she sits down in the throne next to him.
As everyone watches, the two — along with the thrones and the robot dog — fade into Soulburn.
Back in the crowd, Luca lights a cigarette and hands it to his wife, Sofia. "I think the boy did good. Would make Johnny proud."
She smiles at her husband, who fought so hard tonight to keep everyone safe. "I'm proud of you."
"Let's go, boo."

NOT the GLOW 1999: Transporter Jani Blum
Date: December 31, 1999.
Time: 9:17pm.
Place: Outside the Flying Y. Plinkett, Nebraska.
Jani exits the truck stop and lights a cigar. He is all smiles. The smile's name is Tanya and she is definitely flirting. Well, more than flirting. Offering. Her shift ends at 10pm, she said, and a New Year's Eve party of two — three if someone called Darlene is about and down and it seems like Darlene is always down — sounds perfect. Jani is looking forward to it.
He's spent the past three years being a runner with Jacob Maron and life has been pretty grand. They transport things. Various things. A few that are two-legged and wanted. A surprising number of them being mostly legal. Currently dropping off a load of appliances and picking up some farming equipment — and three people who had bounced to avoid warrants for some heinous acts. Got picked up in Plinkett and held. Time to take the three little piggies homes.
That sort of thing. Jacob has settled down a good bit outside the influence of his mom. Still a wolf. Always the next Silver Fox. Only it turns out that werewolves and werecats are good at hunting. So they hunt criminals. Bring them back. Often with a load of scrap to help pay for gas.
The cat's urge to make more of its kind is strong but Jani has found that ancient entities don't know too much about modern birth control. So he is good about wearing condoms. Being careful. Can't have too many random werecats sprouting up around the country. It's already weird enough.
A farmer from out in the podunkier parts of Plinkett has been ranting all afternoon at the truck stop "bar." Where locals and truckers get drunk but deny drinking on premises if law enforcement cares to ask. Frankly, law enforcement makes up a good quarter of the customers. Farmer said that his house just turned blue last night. The "bartender" — big lass named Sheila and Tanya's aunt or mother or some such: bigger breasts, bigger mouth, bigger hips — threatened to cut him off. Jani laughed a good bit at that. He spent a lot of years in a place where miracles were commonplace.
Looking down at the Plinkett Weekly in the newspaper rack — all the news of the week, plus Piggly Wiggly coupons, for a quarter — he sees the front page news. "The GLOW confirmed to be shrinking!" He doesn't need to buy a paper to know the news. People have been talking about it quite a bit. The GLOW had been assumed to be all world consuming on a long enough time line. The faster it grew, the faster the amoeba ate. Some predictions considered 2150 to be a conservative estimate. Only, the past couple of years it had not only stopped slowly spreading but the outer edges are pulling back.
What's more, after reports flowing out that the Witches Three were back, that there was some new Witch-King, that the Rambler got dropped, and other madness: the general vibe about the place is that it has settled down. Still place where the suffering of others powers a mega-city. Only, the suffering is just a little less cruel. Maybe.
Amy and her brother travel the world, spending all the left over Patel money setting up charities and human rights organizations. Ruffling some feathers. Only photos show her always flanked by a pair of bodyguards that seem to make "elite forces" seem inadequate as a turn. A man and a woman. With strange glowing sunglasses. Typical GLOW weirdos. Could be brother and sister. Hard to tell.
Jani stares out at the snow — thin for this time of year according to all the locals but more due to come in shortly — and takes a deep puff of his cigar. Just half an hour to go until he and Tanya waste a night while Jacob waits for January 2nd to hit so he can get the paperwork for the criminals settled. A decent bounty awaits them in Illinois.
Across the field, in the halo of a bright light used during summer time to illuminate a fruit-and-veg stand and during winter to call a few truckers off the interstate, a family is playing in the snow. Making anemic snowmen. A fat-ish man, his Asian wife (also going a bit to fat), and a couple of boys just graduating to toddler status. The kids' laughter is nice, even if the sound echoes funny. Like he is witnessing a memory he never knew he had. And the man...something about him. Maybe it's just strange to see a family out in the cold this time of night. Only, well, long trips on the road: you sometimes have to stop and make do to help the kids run down.
Jani turns back and looks down to the Interstate 80 and sees people heading various ways to the new year. An infinite string of lights and he doesn't know a single one and that's nice. His long years of being paid to know is behind him. Then it hits him. Where he knows the guy from. But that makes no sense.
"Eustace?," he asks, turning. Only the family is gone. Only a set of foot prints starting and ending in the middle of the field.
And overhead the sound of flapping wings, like a giant crow is flying off into the heavens.
DOUG'S COMMENTARY
One of the hardest tricks and one that I might have failed here or there was changing the POV from primarily-Eustace to essentially never-Eustace after his death-and-rebirth. After the scene near the remains of Yuggoth, Eustace is almost entirely described by other people. Even if the fight at the Villa, I had the viewpoint of the villain. Eustace basically became an NPC (and deus ex machina) in his own story.
The white farmhouse that turned blue finally pays off. I had to plop Jani somewhere for the final scene so I figured why not use it. Since the farmhouse is only blue when in the presence of Soulburn, it was a clue that something had brought Soulburn to Plinkett. Just silly little literary tricks.
At the end, I decided that Yori and Abra did escape. They had at least one Adrenaline left, after all. *wink* Only now they are Amy's pets and being used as a force of good.
There were a few questions we never figured out but that's ok. IF the GLOW ever returns, maybe we'll find out about Bee, BrokenRecord, Mrs. Yuuki, the Heretics, and so forth. They are living their lives for as long as they can. Some of them less poorly than others.
I nearly made a mistake. I started writing that scene with Jani as a general transporter of goods — sort of a trucker, though maybe not that specific — before I remembered he was to become a bounty hunter. I blended that together a bit. In my view, Macy never joined Jacob and Jani. Instead she stayed with Barlow in Bunker. The two families from the very origin of werewolves, staying in the pack. Not quite the Kai Yotes this time, but also never quite what they once were. Maybe Gareth will show up somewhere and represent the "something new" but maybe not. The GLOW has plenty new. Lina should still show up in a couple of years. Jacob better watch out.
The idea for this version of a happy ending wasn't exactly organic in the way most of the other mad-cap story was. The idea of Eustace choosing to return as Nurse came to me a couple of episodes back. It was only a question if the team could survive long enough to make it happen. Which they did. Genny is probably the true star of the whole thing since I think he has scored most of the killing blows versus the rougher enemies and kept the team going forward while Eustace and Hitomi each faced their own flavor of burn out. I like to think he has fully retired now, working with Jones to get the Green Lady back. Varvara, I have no idea. Probably back with the ShaoDra and Fractal Apocalypse, making gentle street drugs for the masses.
I probably screwed her backstory up. I don't know. By the end, the idea that her and her brother were Romanian and had escaped to The GLOW and something bad happened that made her take up a monk-ish lifestyle. She had deep rage issues, hence the fighting prowess, but generally wanted it to be behind her.
I also don't remember if I ever gave The Witches Three a species name. I like the idea of it being something a bit too ancient to even be approximated in human speech/writing. I like that it was all sort of a Lovecraftian story but one where Cthulhu gets truly beaten. Screw it.
This has been one hell of a story to write. With the four "double episodes" of Johnny Blue, it ends up being 29 total episodes, some of them quite long, plus some interludes and such. And elements from the story crisscrossed into the Alabama Weird version of Eustace + Hitomi, which crisscrossed back. Stuff like the Rambler collapsing — planned from early on in The GLOW — actually showed up first in Eustace + Hitomi — again at Amy's insistence. It has been draining in the best possible use of that term. It's a messy story with elements being shifted here or there, sped up in places, and slowed down in others.
Still, as far as stories go, it is absolutely amazing to me how much my initial vision blended with the mechanics of solo-play to make something that I wouldn't have made if I had just sat down to write. Originally, it was going to be Eustace and Hitomi getting in a gun fight in the mall, escaping to rescue Amy, and then running a short campaign to carry out her wishes. It kind of got there in the end but the whole Cabal, the fake religions, the world threat, the Space Man, so many fun elements that make it feel unique were all just dice rolls and card draws hitting in the right order.
It really feels like it could have been dozens of other stories had chance worked out a bit differently.
As usual, I'll do a debrief in a day or two so I'll wrap this up here.
One quick thing, a lot of the "reader control elements" — all of them, even — were excised. As my presentation style has changed, some of those elements have become such a part of the story that cutting them out would remove some sense. Also, as we finish prepping for the move it might be days and most likely weeks before I can go back and do stuff like updating episode lists and such. Tags will have to suffice for now.
CREDITS
The GLOW 1996: Psychic Eustace Delmont is played using Two Little Mouse's Outgunned and Outgunned: Action Flicks (especially, but not limited to "Neon Noir" and "Great Powers"). It uses Larcenous Designs' Gamemaster Apprentice Deck: Cyberpunk 2E as its main oracle.
Other sources used include:
- Zach Best's Universal NPC Emulator.
- Cesar Capacle's Random Realities
- Kevin Crawford's Cities Without Number
- Matt Davis' Book of Random Tables: Cyberpunk 1, 2 and 3.
- Geist Hack Games and Paul D. Gallagher's Augmented Realities.
Special big things to Richard Woolcock and Dean Spencer. Their games and art were the spark of all of this and though both Arcane Agents and Dean Spencer's art got left behind as stuff got increasingly complex, this story exists because of the inspiration.
ART CREDIT AND EXPLANATION
Another night in the GLOW: Photo by masahiro miyagi on Unsplash.
The Aftermath is another 3D Render, this one by "A Chosen Soul, because again I wanted to avoid using actual city destruction. Bonus fact: this is the only "Eustace Vision" image in the series that uses the default "Seed 0" render of plasma in GIMP.
"Atop the Rambler" is Photo by Denys Nevozhai on Unsplash. In this case, using the long-shutter effect blending in all the headlights work to give the impression of something like fire underneath. It was also really difficult to find a precise photo I wanted to use because the Rambler, by type, hovers above the other buildings but not like...too far above.
The Flying Y is Photo by Vlad Tomm on Unsplash. Fun Fact: it was so hard to find a good photo during the day I rewrote the scene to be at night.


- Reader Options/Controls
- "Previously..." and Campaign/Arc Summary
- The GLOW 1996: Psychic Eustace Delmont Episode 20 — Heading Up
- Doug's Commentary
- Credits
Previously, on The GLOW: 1996 Psychic Eustace Delmont
After fighting their way to base of the floating skyscraper called the Rambler — the base of the Patel operations — the team has begun their assault on the final piece — and core — of the cabal. Amy Patel has control of the mini-disc and is planning on destroying her family fortune but the team is making sure that all loose ends are tied up first.
About The GLOW: 1996 Psychic Eustace Delmont
Eustace Delmont is a psychic on the cusp of "graduating" into a full-blow Field Psychic. He requests his right to Walk, a brief period of freedom to encourage psychics to see the other side of The GLOW. He tries to finish his long-time partner Jani Blum's final unfinished mission: to find a mini-disc and crack open the Patel crime family. He meets Hitomi Meyer, a criminal hacker. The two are now on the run between a powerful crime family and an even more powerful adversary: The Order and its plans for Eustace.
Content Warning: Occasionally very foul language, lots of smoking, quite intense violence, drinking, gambling, non-graphic sex, drugs, criminal behavior, and black magic. The GLOW is a world of spiritual torture and weird horror.
This post is in the standard Doug Alone post style. See Anatomy of a Post for more details.
Attribution for the tools and materials used—including the splash art—can be found in the Credits below along with some details.
The GLOW: 1996 Psychic Eustace Delmont. Episode 20 — Heading Up
EPISODE SOUNDTRACK: Experia's Hidden Agenda.
Considering how much this episode is inspired by Final Fantasy 7's running up the stairs for Shinra HQ, I resisted the urge to play that soundtrack. However, Experia hits some of the same vibe.
Setting the Scene, e20s1.
No "expected" scene tests for the rest of the campaign arc. This will be "draw a card and make a scene that matches the card.
[c103] 4 (+9 = 13 total). Some keywords "An intellectual challenge or puzzle." "Flashing emergency lights." "Runner job gone wrong." "Personal secrets."
Going with that, and with the fact that scene is lower than normal intensity, we'll say that the alarms and lockdowns are going off around the Rambler and Hitomi needs to fix it. Only, one of the team has some history with the Rambler. The most logical answer is Varvara. Maybe this is part of why she has such a grudge against Patel and tagged along.
DATE PLAYED: June 5, 2025.
Recalling a Cleaner
Date: June 7, 1996.
Time: 2:28am.
Place: The thirteenth floor of the Rambler.
The window gives way with a smash. Eustace, sweat pouring, releases the other four and then sits down hard. Hitomi is the first to him: "Are you ok?"
Let's let the dice decide if he is ok. We'll treat this as a 2xCritical Dangerous Gamble to push himself that hard. Brawn (3) + Cool (2) to represent his mix of physical exertion and psychic power. He gets +1 since he has experience with carrying people in flight mode.
With 7 dice, he actually makes it without any Snake Eyes.
Eustace nods and pats her hand. That stunt probably cost him around four hours of his scant time remaining but they are in. Which is, annoyingly, only around half the fight.
The emergency lights are blaring bright red. Security shutters have fallen to protect the art. Fire doors have swung shut.
Going to roll a d20 (Psychics) vs d12 (Patel). d20 = 11. d12 = 11. The fight outside is pretty much evenly matched right now. Patel has the numbers but psychics have the ability.
The gunfire outside continues. As does the sound of lashings and screams. Hitomi hopes that everyone within a few kilometers' radius has gotten the hint and started vacating hard but she can't help but wonder how many tourists are running towards the battle.

Jones runs up and pushes open one of the fire doors but the side doors seem to be mostly locked down. Shouts of people trapped inside one are loud. Voices of multiple accents crying out for help in at least four languages. "What kind of bastard builds a lock down system that traps workers inside?"
Varvara is the one who answers and she just lets out a loud grunt.
We are on the 13th floor. Let's roll d6-2. 4-2=2. 15th floor, around the halfway mark.
Something in her grunt gives a personal edge away and Hitomi glances at the martial artist with a unspoken question. Varvara, to be heard over the various klaxons, points up. "Floor 15. Head of security office. We should be able to shut it down, there."
"How do you know?"
Varvara chews her lip and suddenly looks to be in her late teens. Hitomi thinks that she isn't going to respond but finally Varvara does: "Varvara Clean. Like, a...portar...a janitor. Because I was."
"Here?"
Varvara nods. "My brother was...a gun. I was a broom. Then my brother..."
"Why didn't you say so?"
Varvara shakes her head.
"We'll get the fucker, ok? I'll make sure you get a chance to punch whomever you need to punch."
Genny interrupts. "Ok, you heard the lady. 15th floor. Stay tight. Any door in our way, we shoot."
The number of doors in their way turns out to be four. Both stairway doors were locked tight and they had to punch through both the outer door to the facilities section on the 15th floor — which looks like the behind-the-scenes scuttle of a large urban mall — and then the door into the security room.
Are there any guards still here? (Good) → [c84] Yes.
The fat man with glasses and the skinny woman chewing on a crucifix jump and put on a pretense of reaching for their guns. Genny gets his up first and says nothing but makes it clear that he will shoot first.
Let's say Brawn (3) + Streetwise (2). +1 for the gun. He gets a Critical. These guards will abandon post and leave.
A few seconds later the pair have fled out into the hall and disappeared to who knows where.
"Those two might be trouble," Jones whispers to Genny.
"Fuck it, we're trouble. Besides, I have shot enough desk jockeys in my day. I want to save my bullets today. Is that ok?"
"Yeah, man."
Inside the room, the security set-up is a lot of state-of-the-art — by GLOW standards — TVs and a couple of small laptop terminals. Would be worth several thousand, probably several several-thousands. Currently the words "LOCKDOWN" flash on several of the computers. Hitomi takes lead and pulls Libby and her laptop out. Setting the robotic dog down (and fully feeling the extra weight that Libby has weighed), Hitomi starts plugging into the system and working. A second wire from her laptop is plugged into Libby.
I don't think I've asked this. Is the Rambler ServiSynth based? (Even) → [c73] No. They definitely use ServiSynths, but not in their mainframe.
"It is complex and esoteric. Built from the ground up by people paid to play the GLOW's rules. Only, it is also deeply secular. Like a code that would work in the real world as well as this shithole."
Jones asks, "Can you get in?"
"Can your ass fly a helicopter? Give me some space."
Crime (3) + Fix (3) + 1 (Libby) + 1 (Laptop). She gets a Jackpot. Oooooooo. The computer system is hers.
Around 2 minutes later, the alarms turn off and the lights go back to their normal glow. The sound of doors unlatching can heard up and down the halls. Shouts of relief. Dozens of trapped workers are now free to try and get out. Only, there's the drop down.
Does the Rambler have some sort of way down besides the hovering elevator? (Good) → [99] Yes.
Most likely it would be something like ladders and inflatables. Though people dropping would have to have a clear place down below.
Hitomi types some commands and the tannoy starts announcing a general evacuation. Emergency escape modules are activated. Only...
"What if the jackasses out there shoot their own coworkers?," Jones once again shows up with the annoying questions.
"I don't know. I could send a message to the troops but they aren't sane."
Jones sighs and brings up his shotgun. "Hey, crow boy, can you send a message to your people down there to punch through and make a corridor?"
Eustace nods.
"Good, I'm going back down and do what I can to get the people out. And if fat guy or cross sucker shoot me, I'm going to haunt Genny."
With that, Jones is gone to try and save as many people as he can.
Setting the Scene, e20s2.
[c117] 5 (+13 = 18 total). Some keywords "A major personal loss occurs." "Find inner peace." A icon of spider webs.
There's going to be ServiSynth's controlled outside of the mainframe that shoot out sticky, trapping stuff. So...kind of a fight but the grit loss is not so much damage as being trapped. Wait, not webs. It traps you in a "psychic web" of some sort. I think I can make this work.
We'll treat this as 2xCritical Attack, Critical Defense, and 10 Grit (no Hot Boxes) [aka, 5x2].
DATE PLAYED: June 5, 2025.
The Past Is a Foreign Country
Date: June 7, 1996.
Time: 2:51am.
Place: The eighteenth floor of the Rambler.
The first sign that something is wrong is when Hitomi remembered the taste of her dad's beer. Oxford. 1984. Her mom's birthday party. A group of academics had come along to swap Thatcher hate while talking shit about students. Her dad had come back from the states with new-wife and new-daughter. The conversation had turned to the philosophical ramifications of some place like The GLOW and after half an hour of hearing about the physical torture of souls as a drunken, Reverend Meyer had become frustrated with how much of a game the whole affair was being treated. In the past month, one of his parishioners had disappeared. Kidnapped. Murdered. Or simply...faded.

When he had — gently — stormed off, he had left behind his warm beer, mostly untouched. Hitomi stared at it for not long at all before reaching over and picking it up to taste a sip. A basic youthful act of defiance. While doing it, Dr. Richaud — the skinniest man she had ever met that managed double chins — had spotted it and winked. Hitomi slightly panicked because she realized that Oxford was not for her and had been building up the courage to move to live with her dad in The GLOW. What if he didn't want her there, anymore? What if a daughter that sips beer is not what he needs with his new-wife and new-daughter?
It was exactly the kind of thought that had plagued her for around two hours. By the time she was sixteen, she had become the kind of surly that hoped someone would give her shit for taking a sip of beer. She later found out that her dad was the kind of father that would maybe tsked lightly before hugging her even harder. She was always welcome at his home. In other words, that two hours of fear were such a minor part of who she was that she had literally not thought about them in a decade. But, there they were.
And just like that, it starts again. Her dad arguing with a woman with hair a color red so fake that it kind of felt natural — Hitomi thinks she was the wife of another professor but realizes her memory space has no recollection of anything like a name — and her dad leaving and fifteen-year-old Hitomi leaning forward to take a sip of beer but this time as she looks up, it is not double-chinned-and-thin Richaud looking at her, it is Eustace.
"You are under psychic attack," he says, sitting there in a chair and behind him the colorful world of her dreams turns gray in his shadow. Like he is the size of a mountain.
How I'm going to do this is roll for everyone and then really only describe the results from Hitomi's perspective.
Nerves + Cool or some other skill if it makes more sense.
- Eustace [2 + 2 but I'll give him +2 because he's pretty shored up as a psychic]: 2xCritical outright. He is very much so dodging the attack.
- Hitomi [2 + 2 but she also gets +1 for Tormented and Eustace is helping her for +1]: She blocks a Critical and a Basic and takes 2 Grit.
- Genny [3 + 3]: Critical + Basic and takes 2 Grit.
- Varvara [2 + 2]: Just a Basic and takes 5 Grit. She's going to get "You Look Scared."
Hitomi chokes her the beer and then spills it. A worse version of her memory. No doubt, as it keeps looping it will get worse and worse. As a couple of professors come over and start helping her to clean up, she ignores them and focuses on Eustace. "How do we get out of it?"
"We fight."
"How?"
"It's your mind. However you want." To demonstrate, Eustace extends claws and stabs into the earth. For a brief second she sees reality. Eustace, Genny, and Varvara standing still as in a trance on the eighteenth floor. That's right, they had to switch stair wells because from here on up it's the upper floors.
While walking across, they...
She turns and punches Richaud in his face before he could pour another pint of beer on top of her. The memory trying to take back over.
Eustace's mental body and physical body are so linked I'll let him take Brawn (3) + Fight (3) + 1 = Extreme. Thats 3 Grit down.
Hitomi is fighting with her mind but we'll let her sneakiness take over. Crime (3) + Survival (2) = No successes.
Genny is going to use his Nerves + Cool, again. Critical + Basic. 1 Grit down (4 total).
Varvara is going to use her Focus (2) + Cool (2) to try and outhink it. She gets another Grit down, (5 total).
Richaud snaps back and then the memory does the same. Only now Eustace is there from the very beginning and it's not her dad they are screaming at, it's him. Her memory is being weaponized to try and force him out. And this time the glass she is picking up and drinking from is blood. She goes quick to trick herself. Like a kid hiding medicine under her tongue.
- Eustace gets Extreme + Basic. The extreme covers him but there's not enough left over to shield others. Instead, he is going to be hitting back. 2 more Grit will be lost (7 total).
- Hitomi is going to use Crime + Stealth (+1 for Eustace's help). She avoids taking any more damage.
- Genny again gets Critical + Basic and takes two more Grit.
- Varvara will switch it up to Focus (2) + Fight (3) as she is bringing the new her into her old self. She takes the full 6 Grit. To avoid this, she will spend her spotlight. She loses the coinflip and does not get it back.
As the memory-professors shout even louder at Eustace, he begins cutting them away. Instead of blood, they bleed glimpses of reality. It is odd, but Hitomi feels his attacks like a headache in her own head.
She fakes drinking the blood at the fake-Richaud turns to wink only as he does his face half slides away. The world is burning itself up and melting to try and keep her inside. She thinks if she is quick she can dive through the holes that Eustace is carving.
Eustace again gets 7 dice. Extreme + Basic. That breaks it.
Hitomi leaps into the putty that barely even attempts to look like Richaud and then finds herself standing around as others are likewise blinking and waking up.
Genny glances over at Eustace. "Thanks for the assist back there."
Eustace nods. Turns to look at Varvara. "I'm sorry about your brother."
"Me too," she says with a sniff and it's clear that she has been crying.
"What was that?," Hitomi asks.
"A psychic trap. Or some sick person's idea of fun. Come on, let's go."
The team heads up the large spiral staircase in the middle of the room. Knowing the real battle is still ahead.
Setting the Scene, e20s3.
[c4] 4 (+18 = 22 total). Some keywords "Tresspass Inconvenient Research." "A social call turns "(b)romantic." "Personal papers."
Someone is going to try and talk the team out of stopping. Someone that might have a personal connection. Maybe a couple of someones. After they get through this, they will be in the final fight scene.
For a person, a name that was never resolved was Dr. Mariya Kazuo. We know that she teaches at Pensacola Polytechnic and that it's a "school" largely to fast track people into various millionaires' and billionaire's payrolls around the GLOW. Patel is one of the sponsors. Kazuo was not really made to be another Patel lackey or tied into the Akari situation, but just for tying up loose ends, she can be here. What is she professor of? Well, we'll say her speciality is in the economic impact of The GLOW but in practically she's more into managing cutting edge technology. Exactly the sort of person who might stay behind despite all the warnings that collapse is imminent blaring.
DATE PLAYED: June 8, 2025.
Skitter Scatter
Date: June 7, 1996.
Time: 3:24am.
Place: The twenty-secondth floor of the Rambler, the floor below the Patel's personal quarters.
"Please evacuate the Rambler, collapse is imminent. This is not a drill. This is not a drill. Please evacuate...," the voice booms out from all directions as the team gets to the top of the spiral stair case.
Ever since the psychic attack on eighteen, the trip has been pretty smooth sailing. The only three armed people they passed were running downstairs so fast that they even stood to one side of the stairs to let Genny keep going. Boxes of paperwork have showed in small piles. A smashed laptop with a scattering of blood where someone seems to have cut themselves on the screen. A small fire near a kitchenette. Patel is the kind of guy who hires the kind of people who develop loyalty only as an extreme version of selfishness. This far up, everyone likely knew of the "plan" but what good is being in the eye of the hurricane when a nuclear bomb is being dropped?
It is the twenty-secondth floor that pulls them to a stop. A huge bank of computers and hundreds of filing cabinets are the primary decorations followed by desks with multiple monitors set-up. A communication hub of sorts. One more populated than any floor they have seen in the past half-hour. The people are running around shoving paperwork and laptop into boxes. Screaming, "HURRY UP!," as they load data into disks. Rats fleeing the ship with blueprints of the ship.
It is one person in particular that Hitomi stops and hails: "Hey, Mariya, what the fuck?"
Dr. Mariya Kazuo. Professor of Economics at Pensacola Polytechnic. Speciality is in ultra-rich economic bubbles and the impact on local economies. The speciality of that specialty is The GLOW and people like Roman Patel. Makes sense that she would have been tapped to work here. Also makes sense why Hitomi hasn't seen Mariya enough in the past three months to break up. Hitomi was worried that dating a woman her mom's age was some kind of weird lesbian oedipal thing. Sex was mediocre at best, anyhow.

Dr. Kazuo turns around and sees Hitomi and lets out a smile. "Mochi, I didn't know you were working for Pat..." Then stops. Takes in the blood and the grime and look on Genny's face. Takes in Eustace. "Oh, this is all your doing, right? You are the one that is taking down the Rambler?"
"Well, it's actually Amy wants to crash her dad's estate, literally, but we are volunteering our services to help her win the worst daughter of the year award. Why don't you go ahead and tell your drones to put their boxes down. No way we're letting this data out of here."
"THIS IS MY LIFE'S WORK!"
"Your life's work is the death of the human race," Eustace says. Only, despite standing just a meter from Hitomi, she can't help but think it sounds like he is shouting with the voice of a jet engine from a kilometer away. So incredibly loud and yet so incredibly quiet. Hitomi watches Mariya's nose start bleeding.
Dr. Kazuo shakes her head and pulls out a small gun and in response Genny and Hitomi both get their guns up as well.
"Are you going to shoot me? And what the fuck is he?"
It is Varvara that answers, her voice sounding icy cold. Hitomi worries that something has broken. What could she have possible seen in the guilt trip room?
"He is something new, and they won't have to shoot you if I break every bone in your body."
Dr. Mariya Kazuo looks around and makes a decision...
Will she put down the gun and surrender? (Even) → [c72] NO!
Genny has Nerves (3) + Shoot (3) + 1 for range. He gets an Extreme.
...she aims her gun right at Hitomi and gunfire explodes out. As Hitomi is opening her eyes, assuming she might be dead, she sees Mariya's body hit the ground. Several of the drones are spinning and seeing Genny aiming a gun at them, start dropping boxes and scattering their materials as they head for the stairs.
Hitomi walks up, lighting a cigarette, and fights back tears that Mariya does not deserve. "Anyhow, I guess I'm breaking up with you..."
Eustace looks around and in the most normal voice he has managed in the past few hours says, "We have to try and take down all this data, can't risk something vital being recovered in the wreckage."
Hitomi has full control of the system from earlier so setting up all the digital aspects should be easy.
For destroying the physical, it might take a lot of time. Let's let Varvara make a roll: Brawn (3) + Fix (2) + 1 (Lighter). She gets a Critical. So that's good enough to do it but they are down another ally.
Hitomi wipes her eyes and starts logging back into the system. Data is scattered all over. It is only a matter of time before she has sent out kill commands from Patel's systems. She uses data from a back catalog of junk: solitaire rules, how to solve Rubik's Cubes, first edition Dungeons & Dragons, the breeding cycle of frogs in Brazil. The kind of stuff that will look like technical instructions and it might take days, weeks, or even years before people realize just how much they have lost.
Genny and Eustace are gathering up papers and putting them into a pile when Varvara approaches Hitomi. "I need your lighter."
"I didn't know you smoke."
"I did, once, not any more. I'm going to burn all this to dust."
Genny, overhearing, starts to point out that it's a lot of files, but Varvara cuts him off. "My brother died...was sacrified...to add a few pennies to Patel's bottom line. I want to destory Patel's dreams and make sure no one can ressurrect them."
"Amy is going to drop this building," Hitomi says.
"Good. Don't worry about me. I'm a gândac de bucătărie. A cockroach. I'll live as long as the universe wills it."
Hitomi hesitates but hands her lighter over to Varvara who nods and then starts to set fire to various piles. Hitomi thinks about it a moment and then goes in and switches off all fire suppression systems. The Rambler has a good chance of burning down. No pun intended.
As the remaining three get into Patel's private lift and start going up, Varvara shouts out to Eustace, "Hey, Witch-King, fix this."
Eustace nods and the elavator doors slide shut.
DOUG'S COMMENTARY
I am tired, space pilgrims. We have managed to cut through a lot of the extra books, DVDs/Blu-rays, boardgames, and pipe tobacco tins but still have several loads left to go before we are finished for the move. There tends to be a variety of muscles sore each and every day, but hey: moving is free gym.
I realized this episode that at some point in time I had dropped the first "r" in "Varvara" and was writing her name as Vavara. I'll go back and fix some of it but no doubt it will be woven into several episodes from here on out.
Not sure if I have much to say. As I stated up near the beginning, the mental image of it was a bit of the scene in Final Fantasy 7 where Avalanche is running up all the stairs at Shinra HQ. Only we focused on a few floors where they were running from one staircase to the other and not the scenes of them having to stop and hold their ribs because they were exhausted.
Tying in Dr. Mariya Kazuo was an odd bonus but I'm fine with it.
I'm ready to play the final episode. We'll start with a Advance and Time Out and then probably half the episode will be a somewhat freeform showdown.
CREDITS
The GLOW 1996: Psychic Eustace Delmont is played using Two Little Mouse's Outgunned and Outgunned: Action Flicks (especially, but not limited to "Neon Noir" and "Great Powers"). It uses Larcenous Designs' Gamemaster Apprentice Deck: Cyberpunk 2E as its main oracle.
Other sources used include:
- Zach Best's Universal NPC Emulator.
- Cesar Capacle's Random Realities
- Kevin Crawford's Cities Without Number
- Matt Davis' Book of Random Tables: Cyberpunk 1, 2 and 3.
- Geist Hack Games and Paul D. Gallagher's Augmented Realities.
ART CREDIT AND EXPLANATION
"Up the Rambler" is Photo by adriaan venner scheepers on Unsplash.
"Alarum" is Photo by Nastuh Abootalebi on Unsplash.
"Garden Party" is this photo.
"Mariya Kazuo" is this photo.