

Nearing the end of the Advent(ure), I wanted to bring in a couple of characters from the older campaign: a rhinoman and a catwoman.
Category: Intermission Page 1 of 2

Faruin is joining Barston and Derron in the fight. A quick Sunday "intermission" to add a new character.

I'm going to use some of my more recent materials — by Philip Reed — to try and come up with a fun little adventure. Mostly by tossing a LOT of things at a wall and see what I feel like scraping off.

The first part of a two part intermission setting up the next steps for Gryffin's "Lighthouse 6" [which is currently 7]. Building up Bernark into a level 1 character followed by leveling up the rest of the party.
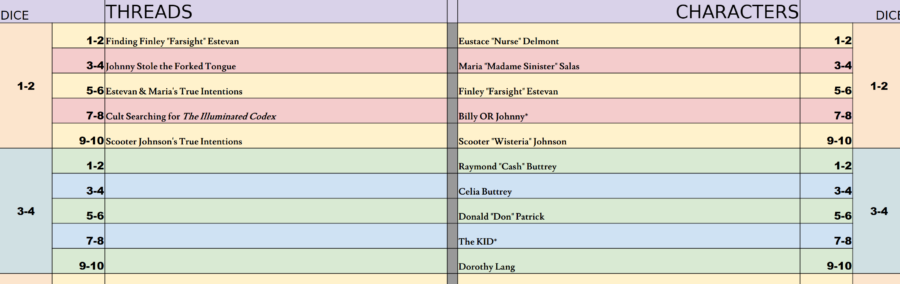
The time has come to move "Agent Johnny Blue vs The Kid" to an actual play series and to help make that happen, the shift to using Mythic has started. I talk about some starting threads and characters, and also about using various features lists in different ways. I also introduce Dixit (using the expansion, Mirrors) to the campaign and to the blog.


After months, it is finally return to the world of the Bleak + Pearl. What changes will I make (both in story and gameplay) and what sort of expectations do I have bringing this back into a more traditional "Doug Alone" format?

One of the most intensive campaign arcs I have played that tapped really hard into the sort of mythos and characters I like. I wasn't completely satisfied but before I get my thoughts in the next post I want to take a moment to go over things and discuss some general beats and moments to better sort my ideas and refresh my memory.


The New Outgunned Book Is Now on Backerkit
The current The GLOW 1996: Psychic Eustace Delmont is based on Two Little Mice's Outgunned RPG. Combining the base game with the first Action Flicks' "Neon Noir" and "With Great Powers" flicks, it plays a bit loose with rules here or there but the system as written is amazing at playing these larger than life type characters and moments.
In what is a pleasant coincidence, the next "chapter" in the Outgunned series - Outgunned Superheroes - is now crowdfunding on Backerkit. Besides the new game, there will be a third Action Flicks, a new Mission Dossier, and a variety of bits and bobs (including a new dice set).
For those that have missed any of the previous stuff, it is pretty much all there. There's a pretty massive €449 "Mightiest Hero" tier that is essentially "get it all in one click." And a few others that allow you to pick up the previous books, dice, coins, and so forth. For people like me who have the books but not the dice, I'm partially going in early just to get those.
Also, one of the flicks in Action Flicks 3 is something very, very near and dear to my heart:

I am stupidly excited for that one.

- The GLOW 1996: Psychic Eustace Delmont Intermission #4 - Finishing Checking in with Rules and Such
- Finishing Up the Check In
- Rereading "Need for Speed" (from Chapter 5)
- Rereading "Mission Start"
- Rereading "Great Powers" and "Neon Noir"
- Switching to One Per Week
- Credits
The GLOW: 1996 Psychic Eustace Delmont. Intermission #4 - Finishing Checking in with Rules and Such
Finishing Up the Check In
A week or so ago — in blog time, more like 2 weeks ago in real time — I got through the first 147 pages of the Outgunned book to tighten up the rules, figure out stuff that I might need to change, and generally plot out ways to make the story feel a bit more Outgunned. Since then, Episodes 5, 6, and 7 have been played and I'm getting ready for Episode 8 which will definitely increase some pressure. Assuming Eustace doesn't score a Jackpot and take down a boss in a single roll. Which might happen.
At any rate, it's a good time for me to finish out the re-read. Especially since my general understanding of those first five chapters was already pretty close to correct but the last chapter is where I only have the vaguest notion of things. I also need to finish out the last bit of Chapter 5. Then, getting that done, I'll move on to Action Flicks and just touch base a little there. Come up with some ideas for opponents that better use the Cyber/Super vibe.
Rereading "Need for Speed" (from Chapter 5)
We had a very short chase/race that was almost for comical effect. I'm not 100% sure there will be much chance for another but I can always force one in if I want.
The basics I get. You have two general numbers: "Need" and "Speed." The Need has a story-element — where you are trying to get or what you are trying to achieve — and a numerical element — a number of Grit-esque boxes ranging from 6 to 18 [page 154] with the note that Need 6 chase might be a bit too short while Need 13+ chases are likely to be too difficult. The recommended rage on page 154 is 8 to 12. In multiplayer games, the Need can be kept a secret.
Speed is the other quality. It is more straightforwardly mechanical in that it is established by known equipment. Rides have a starting speed — Eustace's bike is up 2 as a starting speed since he rewrote it during his Soulburn berserker-y. The story element of speed is a bit abstract and is more about your ability to get out of the chase successfully. No matter where the ride starts it eventually gets up to Speed 5 or Speed 6. On page 154 (again), it notes that at Speed 5 the chase's Action Rolls become a Gamble. Presumably the Reaction Rolls remain merely dangerous [if that]. Then at Speed 6 you start taking -1 to all rolls because you are at Top Speed. There is at least one Feat to counter this but none of my characters have that Feat and it does not seem likely they will get it during this Campaign.
[page 152] At the end of the ACTION Turn, before you check Reaction, you fill a number of Need equal to your current Speed. This is after you calculate changes to your speed. If — and only if — your action would increase your Speed then you get +1 Speed for Critical successes, +2 for Extreme, and +3 for Impossible. A Jackpot means the chase is over. Characters can do other actions instead of trying to focus on increasing their Speed, or just essentially skip their Action turn. If you fail to get any successes, Speed drops by 1. If you have a 0 Speed and this happens, you actually lose a filled box on your Need.
You can choose to skip increasing your Speed [to avoid getting faster than 4, for instance].
The jazz of the chase sequences is the Reaction Turns. This is where the characters — the driver and the passengers — tend to have to do various things to avoid getting hit or tossed around or losing control. It tends to be Dangerous + Critical but can be +/- based on circumstance. On page 153 it points out that you get -1 Speed per person who fails (passengers and driver) but if the driver fails, you also lose one armor.
There are several examples given for types of roll. Here's one: You need to make a sudden turn. The driver rolls Nerves+Dexterity, the others roll Brawn+Force. I like that sort of vibe, truly.
If the ride blows up — runs out of armor and takes more damage — you lose the chase. Makes sense. On page 155 it also has other loss conditions like a minimum speed, a countdown, or having to bail out of the chase. Of course, if everyone loses Grit [possibly just the driver depending on the ride] then the chase is over.
There is the option to having hot boxes on the Need track similar to how they are in combat [page 160]. Then, for Adrenaline, you get a few fun things like "old woman cross the road" or "rush hour traffic..." I like the theme of those.
There are rules for chases on foot [page 159] — similar mechanics but no ride, no driver, and starting speed is 0. Presumably the main loss condition for that would be running out of Grit [with the countdown, minimum speed, and giving up possibly taking place in some situations]. Rules for multple rides on page 158 — if destination is the same, treat it as one chase while if not then treat it as separate chases.
With the comment that there is likely enough data and rules here for this to have likely deserved its own chapter, I think I got the general idea of how to keep chases fun.
Rereading "Mission Start"
When you’re playing Outgunned, you always have a mission to carry out. + Every mission comes with very high stakes. If you and your fellow Heroes don’t get to work, the bad guys will win, and many innocents will pay the price. Both on page 164. Early on, this was definitely a bit of a problem for the campaign. I think with the introduction of the most recent twists in the game, the campaign/arc more re-aligns with the vibe at the core of Outgunned. There is a definite badness that is a core badness. Magnus Odinson — real name not yet released —, Dave Akari, and Roger Patel are all part of an attempt to try and destabilize the Order. Does it make sense? I mean, yeah. It makes enough sense for me to have a good time.
At the beginning of a Turning Point, Heat rises and the Heroes Advance. From then on, you can set Goons aside and start bringing in Bad Guys and Bosses. [page 166] Oooooopsies. Looks like Heat went up. That won't impact too much but it is up to 6, now. Actually, no, there are seom conditions to up Heat [Page 181]: A point of no return (Showdown or Turning Point), when someone is left for dead which the characters have not done, a major defeat, a major failure, or taking too long. The latter is up for debate but since the storyline as a whole has been going for around two days and only the last twenty-four hours has really been a major impact I'd say it's ok. The initial rise was due to the attack in the mall but frankly that's the establishing shot that explains why the heat would be at 4. The Turning Point of stuff going down at the compound would be what gets it to 5.
One thing I am still slightly struggling with is the Villain. Roger Patel is a likely choice but I think more and more it will be Doctor Roman Patel. Roger is kind of a right-hand man to his dad. Roman will be the core of the secret sects and crime family power. By focusing on Roman it makes it less about a one-on-one and taking down a villain that is an older man, though still fit, who deals with everything through layers of subordinates. His daughter somewhat turned on the family — less here than in the Alabama Weird — and the plot line to rescue her is still on the books. Maybe right after the compound. Eustace has slightly forgotten about the disk but that can be soon.
Going with Roman, we get Roger as the main subordinate, and Amy is Roman's weakness. His strong spots will be Organized Crime, Cutting Edge Tech, and Secret Organization. In fact, the fight with the compound is slightly biting into Roman's control of hidden psychics.
I'll save going into the rest of the Villain stuff until we are closer to the Showdown, but the important thing for me to remember is that rolls against the Villain are at -1 until the Showdown and basically stuff like Spotlights can't be used to beat the Villain until the end.
Next significant element in this chapter is Support Characters. Right now there is basically two: Libby and Genny. Libby is help with Hacking. Genny is help with shooting. A few other people might make good ones. One of the goofier street gang members like the ShaoDra or Fractals. Julian. I like the idea of the silly little bike racers to show back up and help since Eustace deeply impressed them. We'll start with the two and I'll build them up as characters with actual stats when it is time.
There are three Plans B per campaign/arc: Bluff, Bullet, and Backup. We can say for sure that Hitomi has used up the Backup by calling in folks to help take the compound once I made the compound more complicated than initially intended. On page 183 it goes into details on the others. Bullet and Bluff are basically what they say on the tin.
And then with rest of the chapter it's a mixture of stuff that seems perfectly fine — like Advancements — and stuff that is mostly ok — like Experiences. Though the attack on the Rambler which may or may not occur is a lot like a Heist, it's not exactly how I'm playing it so I can skip it.
This wraps up the core book which takes us to Action Flicks.
Rereading "Great Powers" and "Neon Noir"
I think most of it is just flavor and feats and such. But starting with "Great Powers" the main thing I see, on page 71, is "Plan B: Blast." In most ways it is just like the Bullet — where a single bullet rewrites the scene to be more positive — only it involves your super powers. Eustace has kind of already ued this trick a couple of times but I'm not counting it because both times it was kind of just of flavor.
Then there are a few important things with "Neon Noir." Use Streetwise in the Sprawl, Style in the Top. This is on page 178. You also have a new rule about using a Gamble. You get +2 to your roll instead of +1, but you take 3 Grit per Snake Eyes. Yowza.
When you lose on the Death Roulette [page 179] you can't use a Spotlight but also can be revived for $3 at a cyberdoc. Makes sense.
There are also some specific rules for cyberwear that I am partially ignoring because Eustace has something slightly different. As the story progresses, we might think more about that.
Switching to One Per Week
At this point I also want to try switching the let's play to a slightly different format where I play throughout the week (a scene or two per mini-session) and then hit post just once a week for the actual plays [with things like intermissions being on a second day, etc]. The overhead for the Outgunned THE GLOW posts is enough that any time saved will be helpful to getting to actually play more. The idea is that I spend the same amount of time working on the playthroughs and the blog, essentially, but rather than 3-5 scenes aim for more like 5-10 scenes per week with a bit more time spent building up and actually playing each scene.
It's not necessarily a guaranteed thing that will stay. For one, it does screw up my "episode format" where there will be more shifts in the middle of each post. When I was doing 3/week then I could run a little long or cut a little short. Only stuff in real life — I have largely lost a lot of mental capacity to play on the weekends so it is much more like an hour here or there throughout the week — kept me cutting stuff shorter and shorter to get the three out. Not all game systems or campaigns require as much overhead so it can vary per campaign.
CREDITS
The GLOW 1996: Psychic Eustace Delmont is played using Two Little Mouse's Outgunned and Outgunned: Action Flicks (especially, but not limited to "Neon Noir" and "Great Powers"). It uses Larcenous Designs' Gamemaster Apprentice Deck: Cyberpunk 2E as its main oracle.
Other sources used include:
- Zach Best's Universal NPC Emulator.
- Cesar Capacle's Random Realities
- Kevin Crawford's Cities Without Number
- Matt Davis' Book of Random Tables: Cyberpunk 1, 2 and 3.
- Geist Hack Games and Paul D. Gallagher's Augmented Realities.
- The GLOW 1996: Psychic Eustace Delmont Intermission #3 - Checking in with Rules and Such
- Why Am I Checking In?
- Rereading "A Time For Action"
- Rereading "Impending Danger"
- Rereading "Gear Up"
- Rereading "Face the Enemy"
- Credits
The GLOW: 1996 Psychic Eustace Delmont. Intermission #3 - Checking in with Rules and Such
Why Am I Checking In?
In game terms, we have just wrapped up what would be roughly equivalent to our second shot. Solo makes it a bit odder. The first shot being getting out of the mall and dealing with the Apostates + Holy Rollers. The second shot being shutting down Ouroboros and getting a job. The third shot will be dealing with the Knives and their allies. Then we should be at a turning point.
I would say generally the story is going about 70% correctly. We are introducing a few wheels within wheels. We are getting some good — but not locked down in stone — character moments. We have a few allies. A few enemies. Some intrigues but not so many the story is self-burying. Remind me to tell you the time I spent sessions trying to get back to the central intrigue in my first ever solo game. I think we have a good start. A fairly solid start.
But not really a great one. The action is a bit too Tricube Tales — and I say that with love. At this point, most of the action feels like it might have come from Cities Without Number, Cyberpunk 2020, or most other games. It has fights. It has dodges. It just does not quite have the explosive, silly oomph I was wanting.
There are some good moments. Eustace slaughtering the Patel goons before they had a chance to move was campaign establishing. Dodging over the collapsing church floor after taking several hits from the security drones worked well for me. The fight with Weird Arms. Hitomi "hacking" a sentient computer by being friendly to a relatively abused system is the kind of lore that moves worldbuilding forward. Also a lot of simple checks just to find stuff that does not really have any danger associated. Moments where simple talking is plenty. Some of that, maybe a lot of that, was the pneumonia. It is hard to think of exciting things when a set of stairs can wind you for several minutes.
The time has come though to ramp this up a bit. The fight with the Knives is a good start, partially because it challenges a central thesis of the arc: Eustace gets his powers from Soulburn. What does he do against enemies that stop it?
Before I do that, though, I want to take a moment to get a bit into a deeper dive with the rules. Go over the chapters and sections, talk about things I could do better or focus on more.
Rereading "A Time For Action"
"If something can go wrong, roll the dice." [page 60].
I think this is the primary thing I would like to tweak. Each time the dice come out I want a general break down of what actually fails when they fail.
Partially this is on me to focus on the scenes and set-pieces that have more action. Gun turrets. Three groups of smaller goons rather than just a single fight with a single big bad. Timers and explosions.
"Most rolls worthy of a Hero are Critical rolls." [page 64].
This is how I have been playing it but it is good to know. Basic should be largely just be used to do more minor rolls where some failure would be fun. Extreme should be more or less the top tier rolls. I think I got this part down ok.
"When Re-rolling, you take all dice that weren't part of a combination and roll them again." [Emphasis mine, page 68].
This I have been doing incorrectly. I even talked about, somewhere, there being an odd mini-game where sometimes you get two Basics and I wasn't sure if you were supposed to risk one of the Basics but picking up those dice and rerolling, especially in cases where you have Snake Eyes. I will, instead, consider a Basic success as "locked" even if it interferes with rerolls.
"If after making a Re-roll or Free Re-roll you got a better result, you can still choose to go All In." [page 69]
I have not used this but probably should. Eustace is very much an "all in" type of guy.
The next little bit is about extra actions from additional successes. I need to work on this a bit. Partially this, especially: "If you passed a roll with flying colors and one of your friends has failed, you can use any of your extra successes to lend them a hand." [page 73] I think I have generally treated extra successes as extra effect, not extra actions. I should tweak that.
Another tweak I need to figure out more about is Help. I think I have doing that wrong. For instance, a gun does not grant Help. It just allows you to enter into a gun fight. A laptop might grant Help to hacking since it brings your tools to the table. Eustace's blades grant help becuause a fist fight doesn't require blades. I'll pull that in a bit.
Rereading "Impending Danger"
I have a bad feeling this is the one where I am going to be handling stuff a bit wrong. For instance...
"The difference between a normal roll and a dangerous roll is that if you fail a dangerous roll, you don’t face the usual consequences for a failure. Instead, you lose a set amount of Grit depending on the difficulty of the failed roll." [page 81] Then it goes on to list the amount of grit. Basic = 1. Critical = 3. Extreme = 9! Impossible = 12. That's a huge jump from Crit to Extreme but ok. The problem is...
"A Gamble is an extremely risky action or reaction, a wager against all odds that runs the risk of backfiring on the Hero. Gamble rolls can be either Dangerous or normal, but in either case, they carry a threat for you to lose additional Grit." [page 86] And then, on the next page [page 89], "Afterwards, look at the dice: for every Snake Eye you rolled, you lose 1 Grit. When doing this, you only count the left on the table after you decided whether to Re-Roll or go All In, regardless of if they are part of a success or not."
The reason this is wrong is you have Gamble Rolls and you have Dangerous rolls and sometimes Gamble Rolls are dangerous but not always. I have pretty much played every combat as a Gamble when sometimes it would not be. It also clarifies that you do count "snake eyes" [aka, 1s] as a hit even if they are part of a success. I thought so, but wanted to double check.
Gambles broadly come from two sources: very dangerous rolls — it lists two variations of this, playing with fire and taking things too far — and going all in which is a +1 and different from the other "All In".
Healing I have been slighly overcomplicating. You essentially heal all Grit when the character (1) sleeps, (2) catches a break, or (3) the end of a shot. It's a bit more automatic and regular, once again re-inforcing the need for higher amounts of action.
Generally conditions I have been playing correctly, just haven't had much use for them overall. One thing to keep in mind is that several conditions have a kind of mini-game aspect that grants an alternate solution. For instance, "You Look Scared" can be removed by facing your fear. That can be fun to play with.
Rereading "Gear Up"
Don't think it really requires a lot that wasn't already discussed above. Equipment is in four categories: Common [just for flavor], Tools [+1 Help or "grants permission"], Guns [obvious], and Rides [also obvious].
Combat is very focused on guns which makes the Eustace vs Hitomi, Sword vs Gun divide a bit odd. Eustace get +1 Help from his swords. Hitomi does not for her gun. I think I might be slightly running combats wrong but we'll get to it.
One thing I missed was "You can lose gear...when you choose to sacrifice it to gain +1 to a roll that you think is extremely important." [page 99] That's a mechanic, like the "All In" that I haven't used. I sort of have in the storyline with Eustace giving up his jacket to steady Bee's nerves, but not really in a way that would impact the mechanics. I'll keep an eye out for opportunities.
A lot of the other bits about Rides and Cash are slightly not necessary. It looks like the stay in the motel should cost $1 [again, in Outgunned terms, it is more a logarithmic scale than anything]. I covered that by saying "there were credits" but good to know in the future. There's stuff for Black Market [page 111] where everything is $1 cheaper and a Gear Up Scene where you can have a shopping spree montage to replicate the moment in a movie where people get a lot of equipment.
On page 110: "Anyway, it’s hard for a Hero to get their hands on more than 1$ at a time, unless they are robbing a bank or some such thing." That slightly changes how I think of some economy. Probably get $1 for the information snagged from Ouroboros. The other two missions will be $2 and $1 respectively.
That being said, Eustace and Hitomi have a large crate of guns that they can borrow from, but they will have the tag of "easily traceable" which means using them will up the Heat.
Rereading "Face the Enemy"
With the "Impending Danger" reread, I'd say most of how I ran fights "wrongly" might be somewhat fixed (in that I treated Reaction Turns as both Gambles and Dangerous). There are a few other things that I need to note, though, to add some spice. The quick run down would look like...
- [page 115] Quick Action + Full Action per Action Turn. Frankly, I'll probably keep this pretty loose since it's solo play but it's the metric.
- [same page] Instead of Brawn + Fight or Nerves + Shoot you can use other combos to fight back if they make sense. These would still wear down the Grit of the enemy as long as they might "might hurt, tire, discourage, or chase away your enemies..."
- [page 116] Likewise, other skill combos can be used for Reactions as long as they make sense.
- [page 117] Fights can start either Action or Reaction, depending on circumstances. This can make surprise and awareness rolls more useful in some cases.
- [same page] If I get additional successes on Reaction, those can be used to counter attack, to do extra actions, or to block damage from others. Blocking damage requires a full additional success.
One thing I was unsure about was the Brawl vs the Fire Fight. Seems like Brawl is more than a simple "fist fight" metric though it is meant to be for less lethal fights [like bar fights or quick punch ups]. Only roll Action Turns but Actions become Dangerous. I'm not sure if that would fit a lot of fights in "Neon Noir" but stuff like the fight in the cafe could have been a nice place to use them.
For gun fights [which would also include Eustace going blade-heavy] the main two things I need to note are [page 124] if the guns fail they use up a mag and [page 125] firing at an enemy in melee — which happens a lot — it's treated as Gamble against the allies in melee. Hitomi is 100% going to end up shooting Eustace at some point.
When Enemies have a Hot Box as their last Grit then they get one last chance to spend their Adrenaline. I'm not sure if that has come up yet but just to remember.
Finally, for the final part of this re-read: Weakspots are more complicated than I have been playing them. On page 147, there are a list of possible ones on a table. Presumably I could also come up with others in a similar vein. An example of one on the table is "The Enemies aren’t really sharp. You can attack with Focus+Know +1."
That's Enough for Now
That re-read gets me up to page 147 out of roughly 190 pages of rules so most of the way. The remaining bits are stuff like Chases (which I haven't ran even once so re-reading wouldn't make much sense), some more technical campaign development, Plans B, and other elements that will likely become more prominent as we get into the Turning Point and then the main campaign arc kicks up. At the Turning Point I'll probably work a shorter version of this post and go ahead and fill out the Villain and Supporting Character info — Libby is going to get some stats!.
The next re-read I'll go over "Neon Noir" as well just to make sure I am getting that down.
CREDITS
The GLOW 1996: Psychic Eustace Delmont is played using Two Little Mouse's Outgunned and Outgunned: Action Flicks (especially, but not limited to "Neon Noir" and "Great Powers"). It uses Larcenous Designs' Gamemaster Apprentice Deck: Cyberpunk 2E as its main oracle.
Other sources used include:
- Zach Best's Universal NPC Emulator.
- Cesar Capacle's Random Realities
- Kevin Crawford's Cities Without Number
- Matt Davis' Book of Random Tables: Cyberpunk 1, 2 and 3.
- Geist Hack Games and Paul D. Gallagher's Augmented Realities.